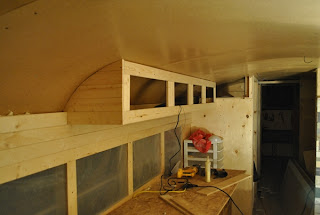
The next week of construction passed like the montage from an eighties movie: there was music, action and a lot of self satisfied back-patting. I managed to pick-up a partial set of cabinets and a coffee table (which became a desk-top) from a couple of thrift shops for a total of 60 dollars and set to work installing them.
I really wanted the cabinets to be a surprise for Kirstin, as I was unable to find a decent set until now and the cabinets I found had a built-in butcher's block and spice rack. I hid them in my in-law's garage and under the cover of night, installed them in the bus. They set-in easily and with an additional trip, I added a lower bathroom cabinet for the sink. This way the kids could use the sink at a younger age and, well, start doing the dishes sooner. The cabinets were topped with ply for the time being and I was ready to spring the surprise.
In hindsight, I've never actually heard anyone say, "Used cabinets! Just what I always wanted!" and so, should not have been disappointed when all I received was, "Cool."
"Are you kidding?" I pouted for a while but eventually gave up realizing that everything about the build wasn't always grand or interesting or a big surprise to all parties. Though the idea of repurposing an old school bus was infinitely fascinating to me, the structure, the integration of needs and function, electrical, proportion and spatial relationships, to others it sometimes seemed I was just screwing boxes together.
It's often impossible to effectively explain why something is interesting without making it wholly uninteresting.
I forgot it and kept going.
A brand spanking new membership to Audible fueled me through the next few steps. I nailed together an enclosed shelf from OSB scrap I had laying around.
Then covered it, and the walls with 1x3" spruce strips. The wood was on sale and for about 50 dollars, I was able to get enough to cover the whole front section of the bus.
I powered-through this phase, rapt in the awe and glory that are audio books. My nailer was cranking almost continuously as I fired nail after nail through the planks and into the wall behind, pinning them in place for good. When I was finished, the place looked a lot more like a home on wheels.
Note: There aren't many pictures of this phase as by very definition, the phrase, "Powered-through" has, "no time for any of that nonsense".
If you're looking for an inexpensive way to cover your walls, wood planks or better yet, lath strips can be employed with a little bit of silicone and a finishing nailer. Less expensive than tongue and groove planks, they go up quick and can help make the inside of anything look a little bit more like a log cabin. They smell good too.


